
Lauren Malhoit
Micetro API Calls with Postman
Get started using Micetro APIs to automate your entire DDI environment all from one place.
May 5th, 2022
Why do you care about whether DDI API documentation is available and accurate? Without API documentation we wouldn't know how to go about creating automation workflows for our DDI environments.
To show how we can use the Micetro API documentation, let's take a look at the concrete example of finding information about an IP address. Because we're going through Micetro, we're going to get more information that we would get from using a CLI tool like ping. We'll be able to get contextual DNS and DHCP information, as well as custom properties like where the device using that IP address resides, down to the city, data center, or rack even. Finding IP information may turn out to be part of a larger workflow, because in order to trigger a task, we have to see the information first.
If you'd prefer to watch a video, please just click the play button below.
What is Postman?
In this example, we're going to use Postman to communicate with the Micetro APIs. Postman is a free tool available in the browser or as a desktop app, and it allows you to communicate with APIs. We've used Swagger in the past, because Swagger is built in to the Micetro API, but Postman has some more capabilities. I'll be using the desktop app.
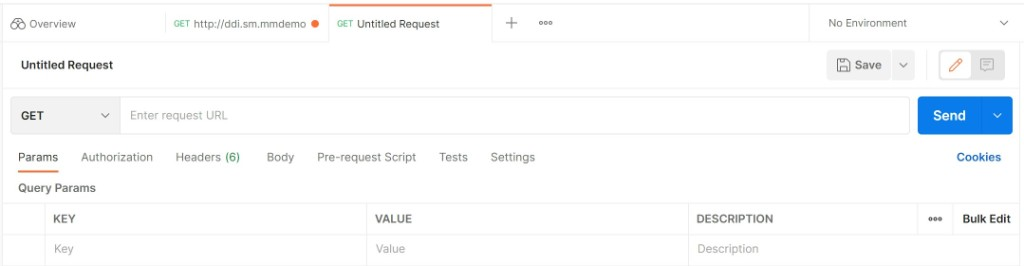
To get started we can just use the default My Workspace within Postman. Here all we have to do is click the + sign to start creating our first Postman API call.
Building the API Call
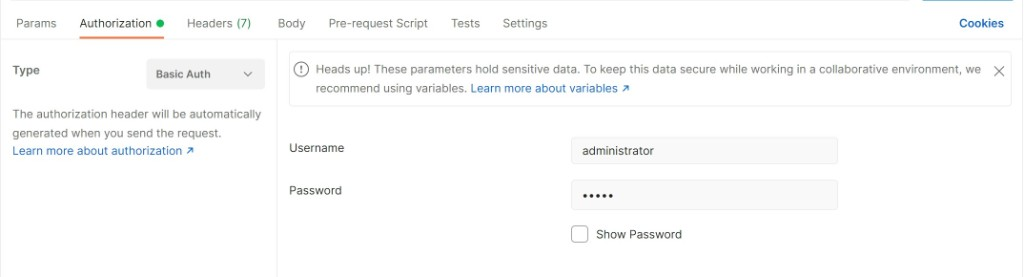
First we'll jump right to authorization. We just need to make sure we're using an account which has access to Micetro and the Micetro API. So, under Authorization, click the drop down menu and select Basic Auth. Then fill in the username and password.
Then we'll make sure we have GET selected in the commands shown on the image above. GET is the command which allows us to read information via the API. Next to GET we need to fill in the Request URL information. This is where the API documentation comes in handy.
We'll copy and paste the URL that we used to get to the API in the first place.
http://ddi.sm.mmdemo.net/mmws/api
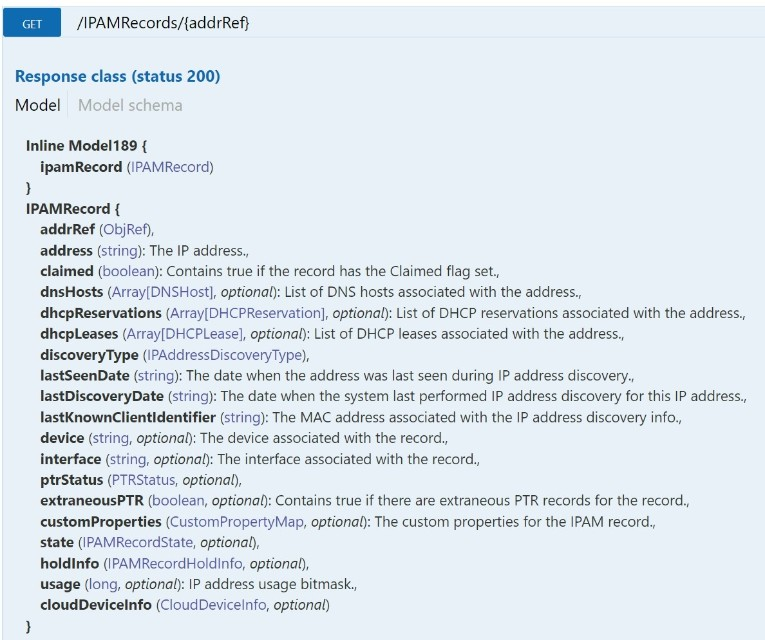
Then we'll append that with the location of the IPAM Records, which we'll find within the API documentation.

So, the full request URL we'll use is:
http://ddi.sm.mmdemo.net/mmws/api/IPAMRecords/{addrRef}
Now, we can't just leave the {addrRef} in there as it is. It's kind of like a placeholder for required information. In place of the {addrRef} we'll go ahead and put either the object reference number, which likely no one would know, or the IP address. I'm opting to use the IP address. All of this information is also obtained from the API documentation.
So, the full request URL will actually be:
http://ddi.sm.mmdemo.net/mmws/api/IPAMRecords/10.13.0.10
You can append it with any IP address you're hoping to get information about, in this case I'm using 10.13.0.10. Once we have that filled out we can click SEND and get all of the information aligned with that IP address.
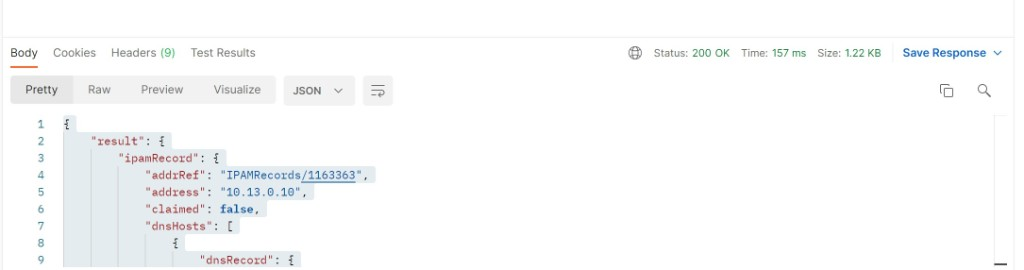
We can see at the top right that we have a status of 200 OK, which means we were successfully able to access the API and get the information about the IP address we needed. Below is a print out of what kind of information would be included:
{ "result": {
"ipamRecord": {
"addrRef": "IPAMRecords/1163363",
"address": "10.13.0.10",
"claimed": false,
"dnsHosts": [
{
"dnsRecord": {
"ref": "DNSRecords/2340047",
"name": "test-automation.micetroautomation.net.",
"type": "A",
"ttl": "3600",
"data": "10.13.0.10",
"comment": "",
"enabled": true,
"dnsZoneRef": "DNSZones/71369",
"customProperties": {}
},
"ptrStatus": "OK",
"relatedRecords": [
{
"ref": "DNSRecords/2340049",
"name": "10.0.13.10.in-addr.arpa.",
"type": "PTR",
"ttl": "",
"data": "test-automation.micetroautomation.net.",
"comment": " Automatically generated by Micetro",
"enabled": true,
"dnsZoneRef": "DNSZones/1912",
"customProperties": {}
}
]
}
],
"dhcpReservations": [],
"dhcpLeases": [],
"discoveryType": "Ping",
"lastSeenDate": "",
"lastDiscoveryDate": "Apr 1, 2022 12:48:50",
"lastKnownClientIdentifier": "",
"device": "",
"interface": "",
"ptrStatus": "OK",
"extraneousPTR": false,
"customProperties": {
"Location": "Indianapolis",
"Device Type": "Test Server",
"Owner": "Lauren" },
"state": "Assigned",
"usage": 24596 }
Using Parameters Instead
As we start building larger calls, it may be helpful to start using the Params functionality. In that case, we still start with the GET command and the Request URL. In this case the Request URL would be:
http://ddi.sm.mmdemo.net/mmws/api/IPAMRecords/
We got this from the documentation, of course, just like we did above. Now we'll click on Params and fill those out. Parameters are key:pair values, which also come from the API documentation as we showed above in the picture of the definitions in the API documentation. In this case, what's required was the addrRef value as indicated by what's in the curly brackets. We also know that by taking a look at Swagger and seeing that the addrRef value is required before we "Try it out."
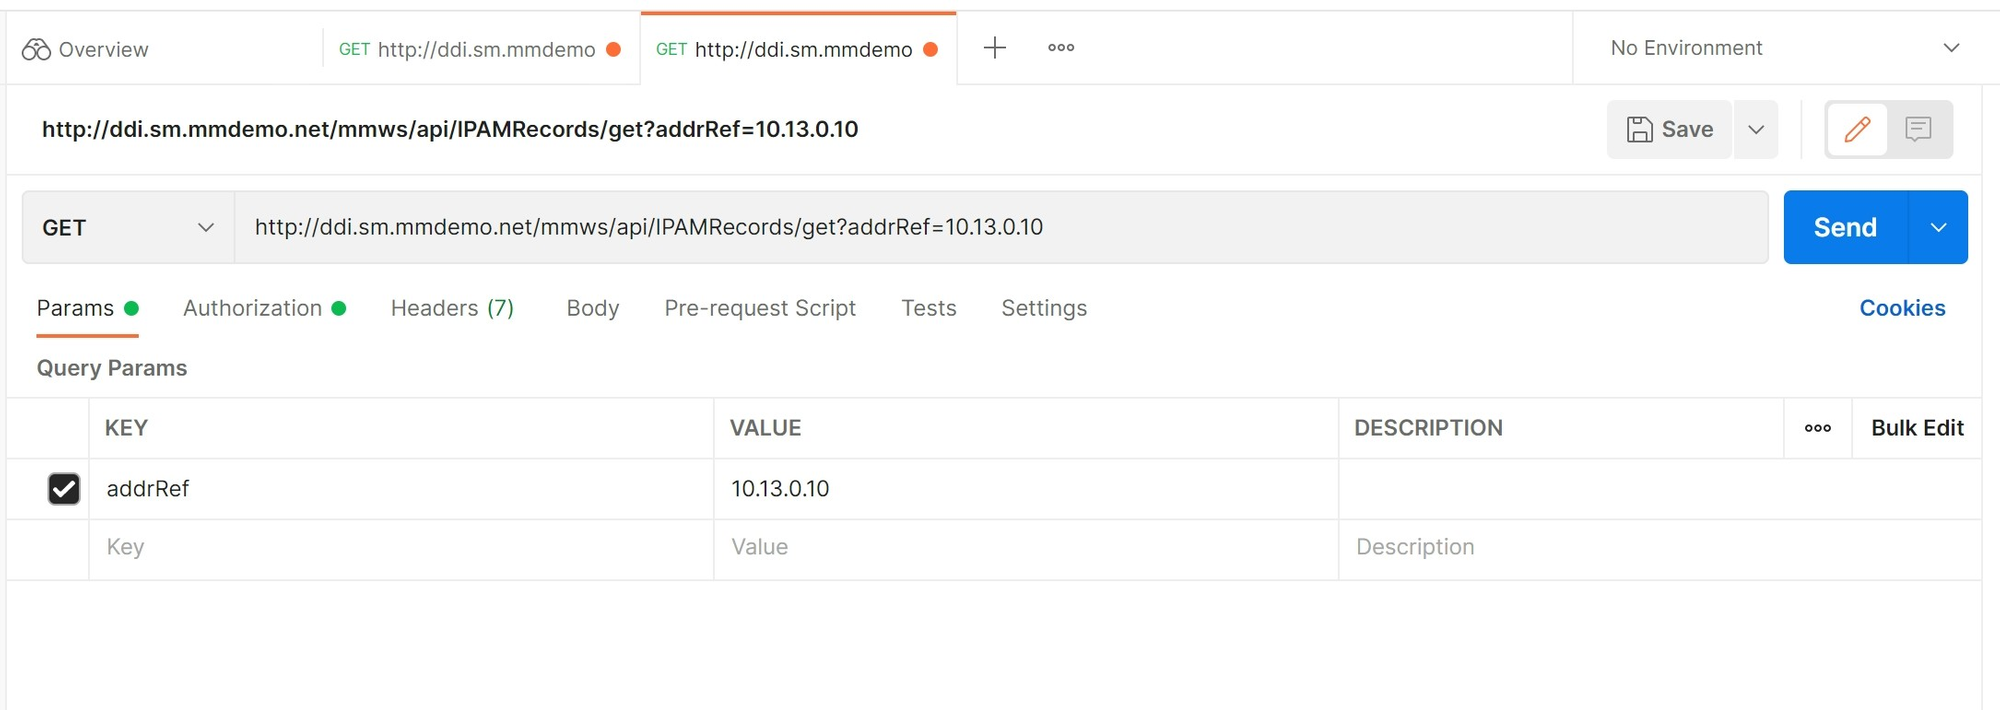
When we use the Query Params we need to also add the word "get" before the ? mark into the request URL as shown in the picture above. The ? is automatically added when you enable one of the key:value pairs as shown in the picture above as well.
Start Using Postman
We should know enough now to start playing around with Postman. If you'd like to try this out in your own environment, you can download a free trial of Micetro any time and get started. Please reach out if you have any questions or suggestions!
