
Lauren Malhoit
Multicloud Data Management and Integration with Azure
Make all your DDI operations possible in a unified platform and integrate heterogenous environments instead of replacing them.
Aug 4th, 2022
Using an overlay and orchestration DDI solution will simplify operations for all of your IT teams whether they specialize in cloud or wear multiple hats managing disparate domains. By providing built-in workflows, reporting, and a fully-featured API layer, Micetro simplifies all DNS, DHCP, and IPAM operations within a unified platform, integrating heterogeneous environments rather than replacing them. Micetro uses this OTT (Over The Top) architecture to help you minimize upheaval, maximize efficiency, and reduce stress.
Configuring Integration Between Micetro and Azure
Men&Mice are a preferred Microsoft partner, so our integration with their on-prem and cloud services are comprehensive. To begin, we'll ensure all the right elements are in place (including any configuration items required on either end). This will simplify:
- administration of zones and zone records
- administration of Virtual Networks (and their characteristics)
- (automated) asset and record synchronization
- workflows (with built-in Change Management)
If you'd like to follow along:
Download: A fully functioning version is available as a free trial and does not require payment details.
Get Micetro Ready for Cloud Services
Micetro is a suite of software services. The most important element of that suite is called Men&Mice Central. Men&Mice Central is the heart and soul of Micetro. All the other elements leverage it or connect to it. The following four elements will facilitate integration with Microsoft Azure (and use Micetro’s Cloud Services component):
- Micetro Central: Running Central on Windows Server will provide additional insight into on-premises AD Sites and Subnets, though it's not required to run on Windows.
- Micetro Web Application
- Micetro Console
- Micetro Server Controller
H4. Custom Roles and Permissions
Let's create a custom “Micetro Operator” role with all the required permissions and access which can perform DNS and IPAM operations.
In Azure go to “Access Control (IAM) / Roles / Add / Add custom role” and edit the JSON tab to reflect the below (but include your own Subscription ID).
{
"properties": {
"roleName": "Micetro Operator",
"description": "",
"assignableScopes": [
"/subscriptions/<your Subscription ID or specify a more granular scope>"
],
"permissions": [
{
"actions": [
"Microsoft.Network/dnsZones/*",
"Microsoft.Network/virtualNetworks/read",
"Microsoft.Network/virtualNetworks/write",
"Microsoft.Network/virtualNetworks/delete",
"Microsoft.Network/virtualNetworks/subnets/read",
"Microsoft.Network/virtualNetworks/subnets/write",
"Microsoft.Network/virtualNetworks/subnets/delete",
"Microsoft.Compute/virtualMachines/read",
"Microsoft.Compute/virtualMachines/instanceView/read",
"Microsoft.Network/networkInterfaces/ipConfigurations/read",
"Microsoft.Resources/subscriptions/resourceGroups/read"
],
"notActions": [],
"dataActions": [],
"notDataActions": []
}
]
}
}
Then a service principal will also need to be created. A service principal is an identity which is required when you have applications, hosted services, or automated tools that need to access or modify resources.
Tip: Don’t forget to apply your custom “Micetro Operator” role to your service principal via your subscription’s “Access Control (IAM) / Role assignments”.
You should now be able to retrieve the following from Azure:
- Tenant ID (from “App registrations/<your_app>/Directory (tenant) ID”)
- Subscription ID (from “<your_subscription>/Subscription ID”)
- Client ID (from “App registrations/<your_app>/Application (client) ID”)
- Client Secret (from “App registrations/<your_app>/Client credentials/Client secrets/Value”)
Adding Microsoft Azure as a Cloud Service
In the Men&Mice Console, go to “Cloud Services”, and with a right-click, select “New Cloud Service” (or once “Cloud Services” is highlighted use the green plus symbol).

Select the type of cloud service required:

Once Azure is selected, we then want to Name our connection, enter a specific Tenant ID, its specific Subscription ID, and then both the Client ID and Client Secret (Value). The configured tenant ID (from the “App registration”) must have the correct role assignment and requisite permissions for the Subscription ID (as previously mentioned).
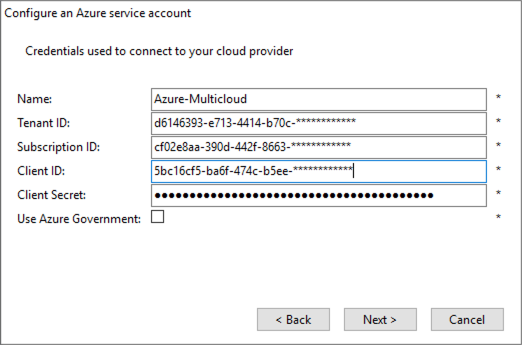
Micetro will get the data from Azure, save the account information, and then you must select the services required.

Micetro will then synchronize with Azure and perform actions on demand.
For More Information
If you'd like more information on how to configure Azure and Micetro integration, or dive deeper into multicloud use cases and common tasks, I highly recommend checking out this comprehensive whitepaper containing business and technical drivers as well as configuration information. There's something for everyone!
