
Lauren Malhoit
DNS Redundancy
Micetro is the only DDI solution to offer multi-vendor DNS redundancy for 100% DNS uptime.
Jun 28th, 2022
What do you do if your DNS provider goes down and you have no control over when it will be back up? Check out Micetro's improved xDNS redundancy capability to make sure the services you provide to your coworkers and customers are up when they need to be.
It's not uncommon to see large sites be taken down because of their dependency on one DNS provider. In some cases human error is the cause, but in many cases DDOS attacks on a DNS provider will cause a ripple affect of outages on multiple clients. The only way to combat an outage which you have no control over is to be ready with a backup. Because Micetro is a non-authoritative DDI solution, it's the only solution which will enable you to share the authority of a DNS zone between multiple providers.
With version 10.3 of Micetro our fantastic dev and product teams have rewritten the xDNS redundancy capability to make it even easier for our customers to use xDNS. We've brought it into the web UI and given customers the ability to create xDNS profiles which will keep all of your DNS information in sync between providers.
What are xDNS Profiles?
Profiles group together two or more DNS services which will share the authority of a list of zones of your choosing. These might be critical zones that you can't have down or perhaps you choose to make all of your zones redundant. Changes within and outside of Micetro are automatically replicated to all DNS services which have been added to the profile. If a conflict arises, Micetro will try to resolve it automatically using the conflict resolution strategy set on the profile.
Conflict Strategies
There are two conflict strategies which may be chosen:
Overwrite existing zones, if a zone with the same name exists on any of the other DNS services which make up the xDNS profile, its records will be overwritten with the record data from the zone instance which is being added to the xDNS profile.
Merge records, if a zone with the same name exists on any secondary service, its contents will be merged with the contents of the zone on the primary service.
How to Create Profiles
Profiles are created under the Admin tab in the Micetro web UI. Simply click on the Create button and provide the necessary information (name, description, conflict strategy) and then pick which services you'd like to group in one profile. Watch the video below for a quick look.
One of the best parts of xDNS is the ability to either accept or reject changes that are made directly within a service. Micetro is non-authoritative, which means we do not require full control over your DNS management. You may actually go in and make changes directly from the DNS service, and Micetro will then pull in those changes. This makes Micetro the most flexibly solution out there, while still be very simple to use. Of course, you may not want admins to be able to make changes outside of Micetro, so you can turn that capability off as well.
Add DNS Zones to Profiles
Once you have profiles created you may now add DNS zones to these profiles. Under the DNS tab of the Micetro web UI, just click on the meatball menu next to the zone of your choice and select "Add to xDNS Profile."
Here a dialogue box will pop up to tell you which services this zone will be added to and it will do a "pre-flight" check for you just to make sure everything is copacetic. Here you'll need to remediate errors and possibly warnings depending on what those warnings are, before you can click Add to add the zone to your xDNS profile.
Not on 10.3 Yet?
Updating Micetro is very easy. In the management console, if it doesn't automatically ask you if you'd like to update, you can simply click on Tools and then Check for Updates. Once you perform the check, the following dialogue box will appear.
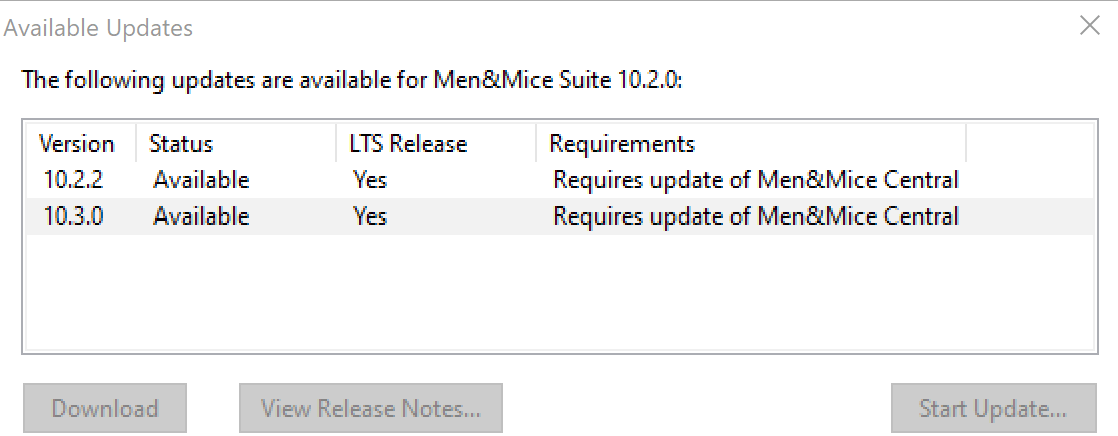
Click on the version you'd like to install and then click on the Download button. If you'd like to see what you're getting, you can click on the View Release Notes to be taken directly to the documentation.
Once the download is complete, which will only take a few seconds, you can click on Start Update. This took me about 2 minutes, over a VPN. Once everything had installed I was able to login to version 10.3 immediately from the web UI. When I re-opened the management console it automatically prompted me to update the management console and that was done in just a few seconds.
See it for yourself!
For more information on xDNS, check out our live webinar with Simon Bell from Paessler and our very own CTO, Sigfus Magnusson. We'll show xDNS in action using Micetro and then how to monitor it with PRTG.
