
Lauren Malhoit
Common DDI Tasks for Azure
Read about the common DDI tasks that can be achieved from combining Azure with the hybrid and multicloud management and visibility offered through Micetro.
Aug 11th, 2022
Simplified Operations are Secure Operations
By using Micetro all DDI (DNS, DHCP, IPAM) administration tasks, related access, and visibility across an organization are centralized. Roles and permissions are allocated across departments, teams, individuals, or technologies. Implementing a “least access principle” is easy, and it protects assets and asset classes from unauthorized changes that may lead to resource exhaustion or unexpected outages.
With management and orchestration performed by Micetro, each service, such as Route53, BIND, or Microsoft AD, continue to provide their own services. This ensures resilience across the range of services your team already relies upon and also simplifies migration to other services in the event that another underlying service may be more appropriate for a particular workload or workflow.
Role Based Access Control
RBAC can be applied with Micetro to more than just macro-level services like DNS, DHCP, IPAM, or reporting. RBAC is also applicable to specific and individual assets managed by Micetro. This allows for exceptionally fine-grained controls at an individual network, container, or zone level.
You can use default out-of-the-box groups and roles, build on them, or start from scratch to create custom roles. There’s also a range of primitives including but not limited to; create, add, read, list, edit, delete, use, enable, and release that can be applied to objects (and their sub-objects) to create roles for:
- DNS servers
- DHCP servers
- DNS zones
- Ranges and DHCP scopes
- Address spaces
- Cloud Networks
- Cloud Services
- ISC DHCP groups
Roles for Micetro’s own general administration and access can be configured and applied if the extensive range of default groups do not suffice.
Optional Workflows for Change Management
Micetro also provides an optional Workflow module that streamlines DNS Change Management. It can be used for the creation, modification, and deletion of Resource Records (RRs). With the Requester (built-in) role project teams, helpdesk technicians, or other engineers, can then raise DNS change requests. The requests require approval from an administrator with the appropriate Approver (built-in) role. Once approved, changes are automatically implemented.
How To Manage DNS in Azure?
Create a DNS Zone in Azure?
Go to the “DNS” section of the Micetro Web UI and then “Create/master zone”. Enter the full Zone name (not forgetting the trailing dot), e.g., “azure.micetro.cloud.”, and ensure you select the correct Master server.

You can now see that the zone has been created in Azure DNS (below) including the SOA and NS records.

In Micetro, you can now perform actions on the zone, assign fine-grained access permissions, and see the full history/audit trail of the zone.
How To Change DNS in Azure
As a DNS administrator, we can choose to create and action a request immediately by selecting Create Now, or as a Requester, by selecting Add to Request.

We can now see that the record has been created:

And also in Azure DNS:

From a single UI or API we can administer records across all our cloud services and DNS servers.
How To Create a Virtual Networks (VNet) in Azure
Creating VNets
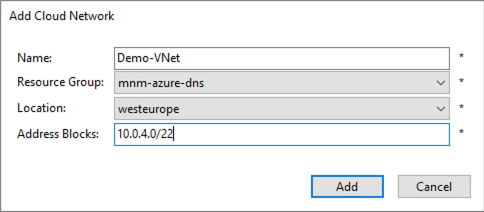
Micetro makes creating VNets easy and will also automatically track our IP allocations via the IPAM. Let’s create a VNet in the “europewest” Azure region using the CIDR block of “10.0.4.0/22,” from which we will allocate two separate subnets of “10.0.4.0/24” and “10.0.5.0/24” from the lower /23.
From the Console, select the appropriate cloud service and then use the green plus (or Ctrl+n) to add a new Cloud Network:

Enter the Name, Resource Group, Location, and Address Blocks required and click Add:
And we can now see our new Demo-VNet listed in Micetro:

But we can also see Demo-VNet is now available and ready for action in Azure:

Let's create two subnets inside our Demo-VNet. We use the green plus button (or Ctrl+n) again to add the details we want for each of the new subnets::

Details (subnet 1):
- Subnet: 10.0.4.0/24
- Title: Untrusted-DMZ-Tier
- Description: This is our example initial DMZ tier within the VNet.
- Cloud Network: Demo-VNet
- Address Range: Reserve Network and Broadcast Address
Details (subnet 2):
- Subnet: 10.0.5.0/24
- Title: Trusted-DB-Tier
- Description: This is our example trusted DB tier within the VNet.
- Cloud Network: Demo-VNet
- Address Range: Reserve Network and Broadcast Address
This results in our subnets also going live in Azure as well as being tracked in Micetro IPAM.
How Can I use the Micetro API to Change DNS in Azure?
Example API Call(s)
Let’s use the Micetro API to look up the earlier IPAM record (17.17.17.17) we created (when we added an A record to the “aws.menandmice.cloud.” zone):
Using macOS/Linux:
curl -silent --user <user>:<password> -X GET \ "https://<your_host>/mmws/api/IPAMrecords/17.17.17.17"
Using Windows Powershell:
$cred = Get-Credential
Invoke-RestMethod -Method GET -Cred $cred -Uri "https://<your_host>/mmws/api/IPAMrecords/17.17.17.17" | ConvertTo-Json -Depth 5
Which results in the following JSON response:
{
"result": {
"ipamRecord": {
"addrRef": "IPAMRecords/36",
"address": "17.17.17.17",
"claimed": false,
"dnsHosts": [
{
"dnsRecord": {
"ref": "DNSRecords/64",
"name": "aeuw1-w0017.azure.menandmice.cloud. [mnm-azure-dns]",
"type": "A",
"ttl": "600",
"data": "17.17.17.17",
"comment": "",
"enabled": true,
"dnsZoneRef": "DNSZones/12",
"customProperties": {}
},
"ptrStatus": "Unknown",
"relatedRecords": []
}
],
"dhcpReservations": [],
"dhcpLeases": [],
"discoveryType": "None",
"lastSeenDate": "",
"lastDiscoveryDate": "",
"lastKnownClientIdentifier": "",
"device": "",
"interface": "",
"ptrStatus": "Unknown",
"extraneousPTR": false,
"customProperties": {},
"state": "Assigned",
"usage": 4
}
}
}
Now, let’s look for the related A record in DNS by specifying the zone and only using a partial search term:
Using MacOS/Linux:
curl -silent --user <user>:<password> -X GET \ "https://<your_host>/mmws/api/DNSZones/azure.menandmice.cloud./DNSRecords?filter=type=A AND name=@aeu"
Or Windows Powershell:
$cred = Get-Credential
Invoke-RestMethod -Method GET -Cred $cred -Uri "https://<your_host>/mmws/api/DNSZones/azure.menandmice.cloud./DNSRecords?filter=type=A AND name=@aeu" | ConvertTo-Json -Depth 5
Which finds (1) record returned:
{
"result": {
"dnsRecords": [
{
"ref": "DNSRecords/64",
"name": "aeuw1-w0017",
"type": "A",
"ttl": "600",
"data": "17.17.17.17",
"comment": "",
"enabled": true,
"dnsZoneRef": "DNSZones/12",
"customProperties": {}
}
],
"totalResults": 1
}
}
Now, let’s create a totally new DNS A record in our zone “azure.menandmice.cloud.” using the name “aeuw1-w0018” and the IP address “17.17.17.18”, and then let’s check it has propagated to Azure DNS and beyond!
First we shall create a small JSON blob in a file called “new.json”:
{
"dnsRecords": [
{
"name": "aeuw1-w0018",
"type": "A",
"ttl": "600",
"data": "17.17.17.18",
"enabled": false,
"aging": 0,
"dnsZoneRef": "DNSZones/12"
}
],
"saveComment": "Created by API"
}
Now let’s send this data from “new.json” to our endpoint “DNSRecords”:
Using MacOS/Linux:
curl --header "Content-Type: application/json" \
--request POST \
--user <user>:<password> \
-d @new.json \
https://<your_host>/mmws/api/DNSRecords
Or Windows Powershell:
$cred = Get-Credential
$body = @(
@{
filename = 'newer.json'
filecontent = [io.file]::ReadAllText("new.json")
}
)
$body | ConvertTo-Json
Invoke-RestMethod -Method POST -Cred $cred -Body $body.filecontent -ContentType 'application/json' -Uri "https://<your_host>/mmws/api/DNSRecords"| ConvertTo-Json -Depth 5
Which should return a HTTP “201 Created” status and the Object Reference (objRef) with no listed errors. We are now pretty happy that a record was indeed created.
{"result":{"objRefs":["DNSRecords/65"],"errors":[]}}
Now, let’s check in Micetro, Azure DNS, and also from the Internet’s perspective:
Micetro:

Azure DNS:

Available Endpoints and Documentation
Once you install the free trial, there is a full set of OpenAPI (Swagger) documentation available directly on your Men&Mice web application accessed via the path /mmws/api/doc/, and the latest product guides are always available at https://menandmice.com/docs.
For more Information
If you'd like to see even more common tasks, understand drivers for a multicloud architecture, or just see how to set up integration between Azure and Micetro please read our comprehensive whitepaper here.
